> For the complete documentation index, see [llms.txt](https://docs.dispel.com/llms.txt). Markdown versions of documentation pages are available by appending `.md` to page URLs; this page is available as [Markdown](https://docs.dispel.com/documentation/documentation-ja/meru/getting-started-with-dispel/org-admin-quick-start-guide.md).
# Org Admin クイック スタート ガイド
Organization Admin 向けの初回実行パス: アカウントと MFA を設定し、サブネットをプッシュし、施設とデバイスを作成し、アクセスを付与し、最初の接続を検証します。
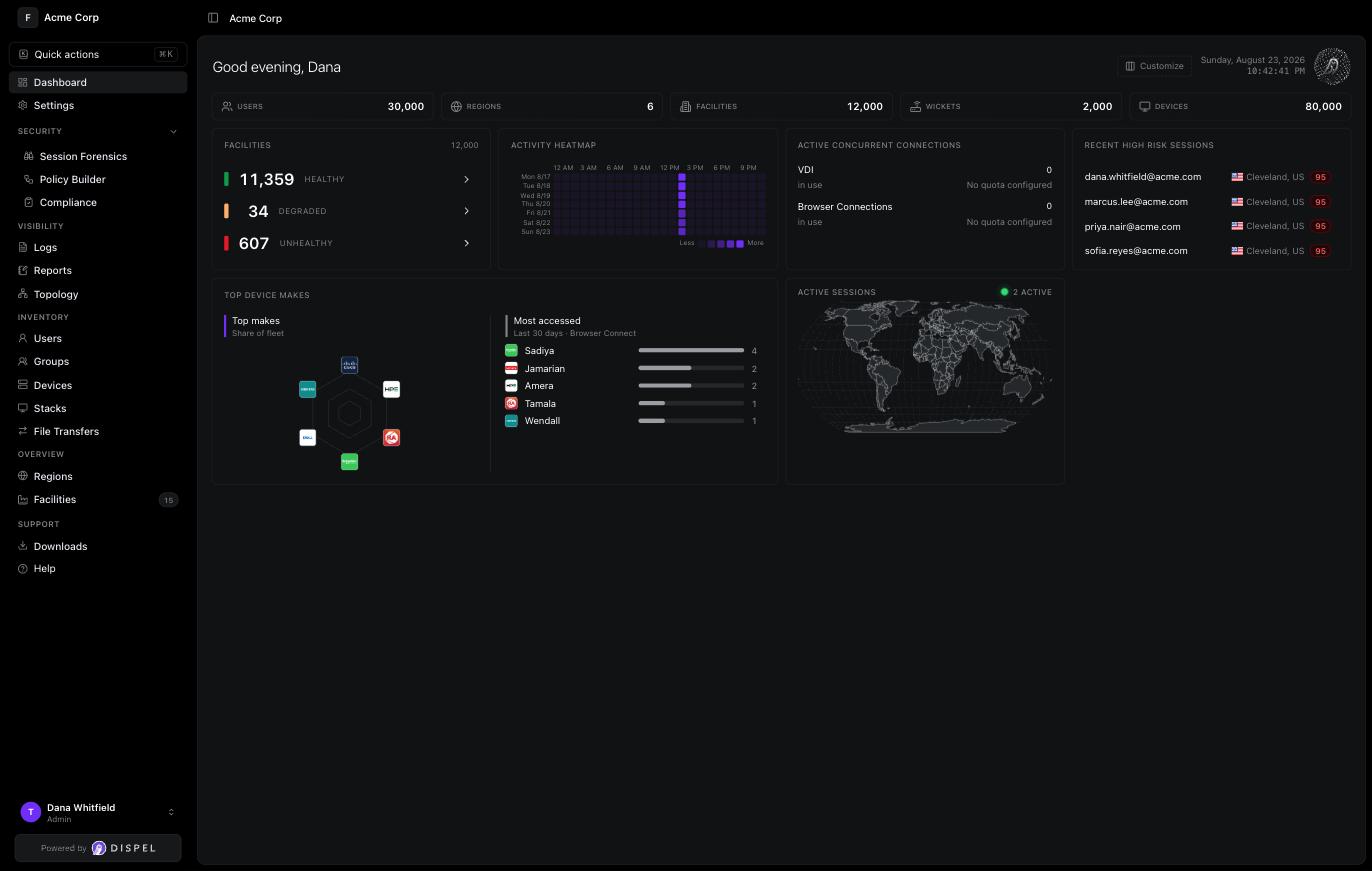
Organization Admin として、他のすべてのユーザーが接続するデプロイメントを設定します。このガイドでは、最初のサインインから接続が機能するまでの流れを、各要素が前の要素に依存する順序で説明します。サインインするとダッシュボードが表示され、ユーザー、リージョン、施設、Wicket、デバイスに加えて、施設のヘルスとアクティブなセッションが要約表示されます。
## 手順 1: アカウントと MFA を設定する
メールに Dispel が送る招待から始めます。アカウントを作成し、パスワードを設定して、多要素認証方式を登録し、 [**ダッシュボード**](https://app.dispel.com).
{% content-ref url="/pages/900b00f174e2b77952d4bee0661ae1dfc2291dcd" %}
[Dispel アカウントを作成する](/documentation/documentation-ja/yztoakusesuwosuru/users/create-a-dispel-account.md)
{% endcontent-ref %}
## 手順 2: リージョンと Wicket を理解する
リージョンは施設が存在するリモートアクセス ネットワークであり、Wicket は施設をそのリージョンに接続するアプライアンスです。Organization Admin として、両方を自分で設定します。あなたのロールではリージョンと Wicket を作成できるため、Dispel と個別に調整するのではなく、自分でプロビジョニングします。構築を始める前に、それらがどのように連携するかを確認してください。
{% content-ref url="/pages/ad91e4ee9cb72e373413266731ada23968a402eb" %}
[デプロイメント インフラストラクチャ](/documentation/documentation-ja/wosuru/infrastructure/deployment-infrastructure.md)
{% endcontent-ref %}
## 手順 3: サブネットを Wicket にプッシュする
CIDR 表記で、そのサブネットを対応する Wicket に割り当てます。サブネット内にデバイスを追加する前にそのサブネットをプッシュすると、それらのデバイスに Wicket 経由で到達できるようになります。
{% content-ref url="/pages/9b1b11336230f6a2bb1611427c106687dc920f20" %}
[サブネット管理](/documentation/documentation-ja/wosuru/infrastructure/deployment-infrastructure/wickets/subnet-management.md)
{% endcontent-ref %}
## 手順 4: 施設を作成する
施設は、リージョン内のユーザーとデバイスを整理します。開いて [**施設**](https://app.dispel.com/facilities)、クリックし **新しい施設を作成**、次にリージョンを選択し、施設名を入力します。
{% content-ref url="/pages/58742c3db6a5717401cd5ba2ad2d72eef8b3f67a" %}
[施設](/documentation/documentation-ja/wosuru/infrastructure/deployment-infrastructure/facilities.md)
{% endcontent-ref %}
## 手順 5: デバイスを作成する
デバイスをその施設の下に追加し、ユーザーがアクセスするポートとプロトコルを設定します。これらのポートとプロトコルが、デバイス ACL で許可する対象です。
{% content-ref url="/pages/df97acc899eca67587564449b85a6b25b81ee04f" %}
[デバイスを追加する](/documentation/documentation-ja/wosuru/infrastructure/device-management/create-a-device.md)
{% endcontent-ref %}
## 手順 6: 接続方法を有効にする
ユーザーがデバイスに到達する方法を選択します。リージョン向けに Virtual Desktop スタックを構築するか、リージョンで Browser Connect を有効にしてから、デバイスごとにオンにします。
{% content-ref url="/pages/506109b1de982bae7d2e78f81aceb60360251c68" %}
[スタック](/documentation/documentation-ja/shisutemunisuru/connection-methods/virtual-desktops/stacks.md)
{% endcontent-ref %}
{% content-ref url="/pages/772b2bb866ad8e9adb12c0e53204ef0c2ebcdfcc" %}
[リージョンで Browser Connect を有効にする](/documentation/documentation-ja/shisutemunisuru/connection-methods/browser-connect/enable-browser-connect-for-a-region.md)
{% endcontent-ref %}
## 手順 7: ユーザーを招待する
組織に招待して、接続するユーザーを追加します。ロールによって、最初に付与される組織権限が決まります。
{% content-ref url="/pages/87a56fa6593a19387d5c3184f374003493824c1c" %}
[ユーザーを招待する](/documentation/documentation-ja/yztoakusesuwosuru/users/invite-a-user.md)
{% endcontent-ref %}
## 手順 8: ユーザーを施設に追加する
ユーザーを、そのデバイスが属する施設に追加します。先に施設へ追加しておくと、デバイス ACL を付与し、その施設のアクセス ウィンドウにも含めることができます。
{% content-ref url="/pages/2f35b4e87a7eb2be042f01353e3c3ce27e3da88e" %}
[施設にユーザーを追加する](/documentation/documentation-ja/wosuru/infrastructure/deployment-infrastructure/facilities/add-a-user-to-a-facility.md)
{% endcontent-ref %}
## 手順 9: デバイス ACL を設定する
ユーザーが意図した対象のみに到達できるよう、ポート単位・プロトコル単位でデバイスへのアクセスを許可します。
{% content-ref url="/pages/b895d633988627bdfa9220e495c41060d40ae7d2" %}
[デバイス アクセス(ACL)](/documentation/documentation-ja/wosuru/infrastructure/device-management/device-access-acls.md)
{% endcontent-ref %}
## 手順 10: アクセス ウィンドウを作成する
組織で接続にアクセス ウィンドウが必要な場合は、その施設用に作成します。管理者はウィンドウを直接作成し、追加したメンバーは予定した期間にアクセスできます。
{% content-ref url="/pages/1b2ad43aa2df9cac87b5c0df8069478ee896ce57" %}
[承認済みのアクセス ウィンドウを作成する](/documentation/documentation-ja/shisutemunisuru/access-windows/create-an-approved-access-window.md)
{% endcontent-ref %}
## 手順 11: 初回接続を確認する
自分で接続して、経路全体を確認します。Virtual Desktop を予約するか、Browser Connect セッションを起動して、デバイスに接続します。
{% content-ref url="/pages/9d2af2c69c848fb9c61e5c78fd4e13defe39145c" %}
[Virtual Desktop を予約する(管理者)](/documentation/documentation-ja/shisutemunisuru/connection-methods/virtual-desktops/reserve-a-virutal-desktop-admin.md)
{% endcontent-ref %}
{% content-ref url="/pages/0e70b69162a44bfecf7a6bca2cee8d117e31fe5a" %}
[Browser Connect セッションに接続する(管理者)](/documentation/documentation-ja/shisutemunisuru/connection-methods/browser-connect/connect-to-a-browser-connect-session-admin.md)
{% endcontent-ref %}
## 次に進む場所
多数の人を一括管理するには、デバイスとアクセス ウィンドウを [組織グループと施設グループ](/documentation/documentation-ja/yztoakusesuwosuru/groups.md)。ユーザーのサインイン方法を管理するには、 [Policy Builder](/documentation/documentation-ja/shisuru/policy-builder.md).
---
# Agent Instructions
This documentation is published with GitBook. GitBook is the documentation platform designed so that both humans and AI agents can read, navigate, and reason over technical content effectively. Learn more at gitbook.com.
## Querying This Documentation
If you need additional information that is not directly available in this page, you can query the documentation by asking a question.
Perform an HTTP GET request on the following URL with the `ask` and `goal` query parameters:
```
GET https://docs.dispel.com/documentation/documentation-ja/meru/getting-started-with-dispel/org-admin-quick-start-guide.md?ask=&goal=
```
`ask` is the immediate question: it should be specific, self-contained, and written in natural language.
`goal` is what the user is ultimately trying to achieve, the reason they need the answer. Sharing it helps GitBook give you a better, more relevant answer. A goal is most helpful when it describes the outcome the user wants rather than restating the question. For example, with `ask=how do I create an API token`, a goal like `automate deployments from our CI pipeline` lets GitBook tailor the answer to that use case.
The response will contain a direct answer to the question and relevant excerpts and sources from the documentation.
Use this mechanism when the answer is not explicitly present in the current page, you need clarification or additional context, or you want to retrieve related documentation sections.