> For the complete documentation index, see [llms.txt](https://docs.dispel.com/llms.txt). Markdown versions of documentation pages are available by appending `.md` to page URLs; this page is available as [Markdown](https://docs.dispel.com/documentation/documentation-zh/kai-shi-shi-yong/getting-started-with-dispel/org-admin-quick-start-guide.md).
# 组织管理员快速入门指南
组织管理员的首次使用路径:设置账户和 MFA,推送子网,创建设施和设备,授予访问权限,并验证首次连接。
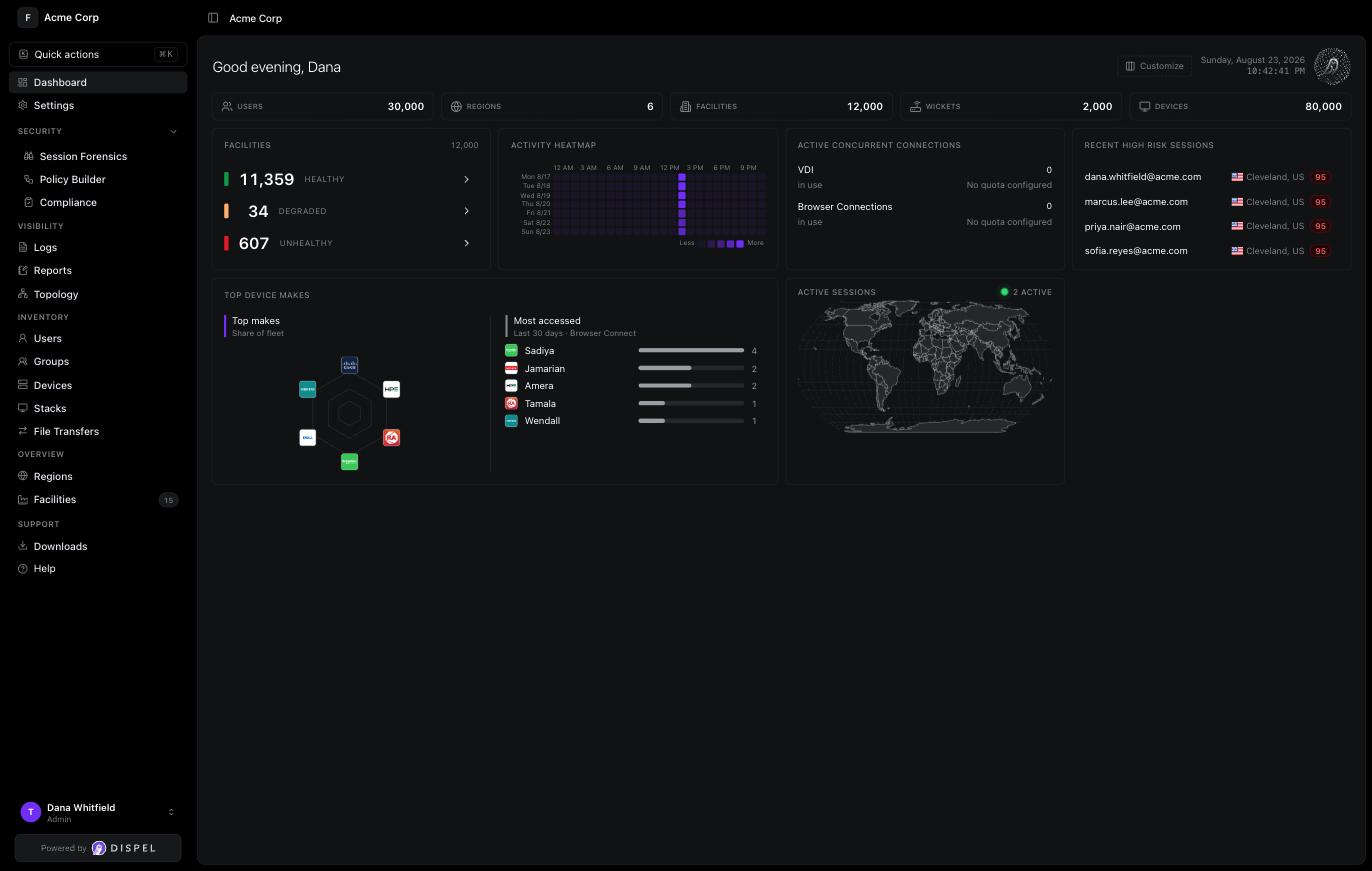
作为组织管理员,您要搭建所有其他人通过其连接的部署。本指南按各个部分相互依赖的顺序,从您首次登录到建立可用连接逐步说明。登录后,您会进入仪表板,其中会汇总您的用户、区域、设施、Wicket 和设备,以及设施健康状况和活跃会话。
## 步骤 1:设置您的账户和 MFA
从 Dispel 发送到您邮箱的邀请开始。创建您的账户、设置密码,并注册一种多因素验证方式以进入 [**仪表板**](https://app.dispel.com).
{% content-ref url="/pages/dca68365b59b60a2e1fd7536b6d973fdb2494b92" %}
[创建 Dispel 账户](/documentation/documentation-zh/guan-li-yong-hu-he-fang-wen/users/create-a-dispel-account.md)
{% endcontent-ref %}
## 步骤 2:了解您的区域和 Wicket
区域是您的设施所在的远程访问网络,而 Wicket 是将设施连接到该区域的设备。作为组织管理员,您需要自行设置两者。您的角色可以创建区域和 Wicket,因此您是对它们进行配置,而不是由 Dispel 为每个对象分别安排。请在构建其上的内容之前,先了解它们如何协同工作。
{% content-ref url="/pages/2d2a6547309955aac0880856d0ff320d0d8d6841" %}
[部署基础架构](/documentation/documentation-zh/gou-jian-ni-de-huan-jing/infrastructure/deployment-infrastructure.md)
{% endcontent-ref %}
## 步骤 3:将子网推送到 Wicket
使用 CIDR 表示法将该子网分配给其 Wicket。在向其中添加设备之前先推送子网,这样这些设备就可以通过 Wicket 访问。
{% content-ref url="/pages/9d099e41a3f3ef7fd5caa73d9a36cb44b8325512" %}
[子网管理](/documentation/documentation-zh/gou-jian-ni-de-huan-jing/infrastructure/deployment-infrastructure/wickets/subnet-management.md)
{% endcontent-ref %}
## 步骤 4:创建设施
设施用于组织某一区域内的用户和设备。打开 [**设施**](https://app.dispel.com/facilities),点击 **创建新设施**,然后选择一个区域并输入设施名称。
{% content-ref url="/pages/464b5289aba154acf5472940d97aa9bada986e84" %}
[设施](/documentation/documentation-zh/gou-jian-ni-de-huan-jing/infrastructure/deployment-infrastructure/facilities.md)
{% endcontent-ref %}
## 步骤 5:创建设备
在其所属设施下添加该设备,并设置人们将通过哪些端口和协议访问它。这些端口和协议就是您在设备 ACL 中授予的内容。
{% content-ref url="/pages/6f312bebf6e37ff4883c137ad794d2213bb46f58" %}
[添加设备](/documentation/documentation-zh/gou-jian-ni-de-huan-jing/infrastructure/device-management/create-a-device.md)
{% endcontent-ref %}
## 步骤 6:启用连接方式
选择人们访问该设备的方式。为该区域构建一个虚拟桌面堆栈,或为该区域启用 Browser Connect,然后按设备开启它。
{% content-ref url="/pages/a160744688d8ee713605dc64405ff54c73c334d3" %}
[堆栈](/documentation/documentation-zh/lian-jie-dao-ni-de-xi-tong/connection-methods/virtual-desktops/stacks.md)
{% endcontent-ref %}
{% content-ref url="/pages/5c18923c3f14db7d77205f439c70fa1951c1303f" %}
[为某个区域启用浏览器连接](/documentation/documentation-zh/lian-jie-dao-ni-de-xi-tong/connection-methods/browser-connect/enable-browser-connect-for-a-region.md)
{% endcontent-ref %}
## 步骤 7:邀请用户
通过将该人员邀请到组织中,添加将要连接的人。他们的角色决定了其起始时具备的组织权限。
{% content-ref url="/pages/0101538b70650d9cff9c2e8212cb675324bd7c29" %}
[邀请用户](/documentation/documentation-zh/guan-li-yong-hu-he-fang-wen/users/invite-a-user.md)
{% endcontent-ref %}
## 步骤 8:将用户添加到设施
将用户添加到其设备所在的设施。先将他们添加到设施中,才能授予设备 ACL,并将他们包含在该设施的访问窗口中。
{% content-ref url="/pages/b0a3f52a14be3ee443bd67ebeac3a142ac939f42" %}
[向设施添加用户](/documentation/documentation-zh/gou-jian-ni-de-huan-jing/infrastructure/deployment-infrastructure/facilities/add-a-user-to-a-facility.md)
{% endcontent-ref %}
## 步骤 9:设置设备 ACL
按端口、按协议授予用户对该设备的访问权限,这样他们只能访问您意图允许的内容。
{% content-ref url="/pages/2079edf58006951f816599ba0b5802c85fadd53a" %}
[设备访问(ACL)](/documentation/documentation-zh/gou-jian-ni-de-huan-jing/infrastructure/device-management/device-access-acls.md)
{% endcontent-ref %}
## 步骤 10:创建访问窗口
如果您的组织要求通过访问窗口进行连接,请为该设施创建一个。作为管理员,您可直接创建该窗口,而您添加的成员将在您安排的时段内获得访问权限。
{% content-ref url="/pages/afb428a2ea574b5c8dbf5444697a63d7b97f2196" %}
[创建已批准的访问窗口](/documentation/documentation-zh/lian-jie-dao-ni-de-xi-tong/access-windows/create-an-approved-access-window.md)
{% endcontent-ref %}
## 步骤 11:验证首次连接
通过亲自连接来端到端确认这一路径。预留一个虚拟桌面,或启动 Browser Connect 会话,并访问该设备。
{% content-ref url="/pages/e61952b40da500d8d262a80973c98121ecc75335" %}
[预留虚拟桌面(管理员)](/documentation/documentation-zh/lian-jie-dao-ni-de-xi-tong/connection-methods/virtual-desktops/reserve-a-virutal-desktop-admin.md)
{% endcontent-ref %}
{% content-ref url="/pages/7ea979971cc457a2790f5ce633da16e7aae92dad" %}
[连接到浏览器连接会话(管理员)](/documentation/documentation-zh/lian-jie-dao-ni-de-xi-tong/connection-methods/browser-connect/connect-to-a-browser-connect-session-admin.md)
{% endcontent-ref %}
## 下一步去向
若要一次管理多个人,请通过 [组织和设施组](/documentation/documentation-zh/guan-li-yong-hu-he-fang-wen/groups.md)分配设备和访问窗口。若要管理人们如何登录,请设置 [策略构建器](/documentation/documentation-zh/bao-hu-yu-zhi-li/policy-builder.md).
---
# Agent Instructions
This documentation is published with GitBook. GitBook is the documentation platform designed so that both humans and AI agents can read, navigate, and reason over technical content effectively. Learn more at gitbook.com.
## Querying This Documentation
If you need additional information that is not directly available in this page, you can query the documentation by asking a question.
Perform an HTTP GET request on the following URL with the `ask` and `goal` query parameters:
```
GET https://docs.dispel.com/documentation/documentation-zh/kai-shi-shi-yong/getting-started-with-dispel/org-admin-quick-start-guide.md?ask=&goal=
```
`ask` is the immediate question: it should be specific, self-contained, and written in natural language.
`goal` is what the user is ultimately trying to achieve, the reason they need the answer. Sharing it helps GitBook give you a better, more relevant answer. A goal is most helpful when it describes the outcome the user wants rather than restating the question. For example, with `ask=how do I create an API token`, a goal like `automate deployments from our CI pipeline` lets GitBook tailor the answer to that use case.
The response will contain a direct answer to the question and relevant excerpts and sources from the documentation.
Use this mechanism when the answer is not explicitly present in the current page, you need clarification or additional context, or you want to retrieve related documentation sections.