> For the complete documentation index, see [llms.txt](https://docs.dispel.com/llms.txt). Markdown versions of documentation pages are available by appending `.md` to page URLs; this page is available as [Markdown](https://docs.dispel.com/get-started/getting-started-with-dispel/org-admin-quick-start-guide.md).
# Org Admin Quick Start Guide
The first-run path for an Organization Admin: set up your account and MFA, push a subnet, build a facility and a device, grant access, and verify a first connection.
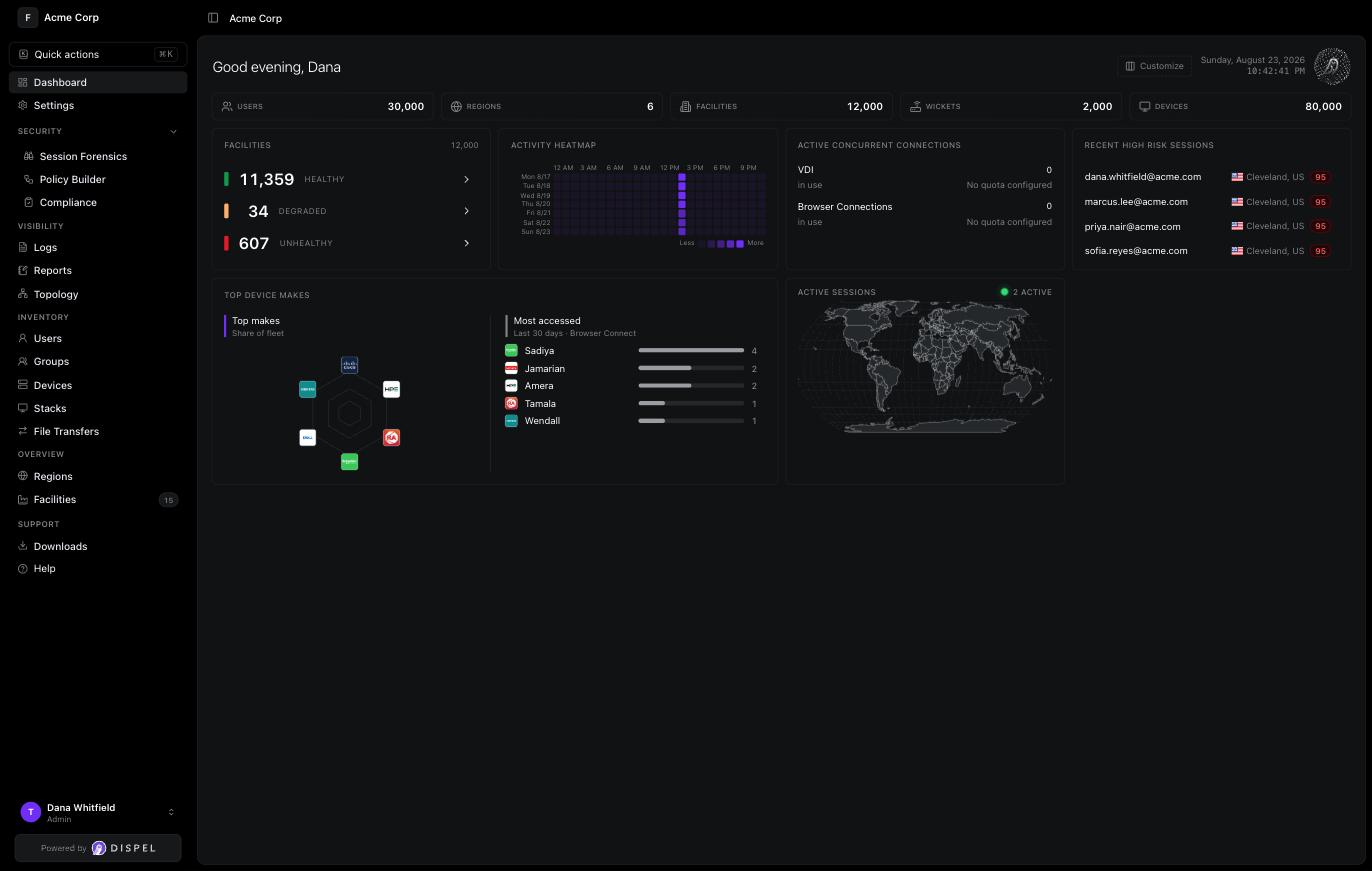
As an Organization Admin, you set up the deployment everyone else connects through. This guide follows the path from your first sign-in to a working connection, in the order each piece depends on the one before it. After you sign in, you land on the dashboard, which summarizes your users, regions, facilities, Wickets, and devices alongside facility health and active sessions.
## Step 1: Set up your account and MFA
Start from the invitation Dispel sends to your email. Create your account, set a password, and register a multi-factor method to reach the [**dashboard**](https://app.dispel.com).
{% content-ref url="/pages/SjVid6Iv3AbNOx9nV650" %}
[Create a Dispel Account](/manage-users-and-access/users/create-a-dispel-account.md)
{% endcontent-ref %}
## Step 2: Understand your regions and Wickets
A region is the remote-access network your facilities live in, and a Wicket is the appliance that connects a facility to that region. As an Organization Admin you set up both yourself. Your role can create regions and Wickets, so you provision them rather than arranging each one with Dispel. Review how they fit together before you build on top of them.
{% content-ref url="/pages/AQp4s7BOs42WJPhLVyRD" %}
[Deployment Infrastructure](/build-your-environment/infrastructure/deployment-infrastructure.md)
{% endcontent-ref %}
## Step 3: Push a subnet to a Wicket
Assign the subnet to its Wicket in CIDR notation. Push the subnet before you add devices in it, so those devices are reachable through the Wicket.
{% content-ref url="/pages/eRAJ0swvgypkaaAGnigC" %}
[Subnet Management](/build-your-environment/infrastructure/deployment-infrastructure/wickets/subnet-management.md)
{% endcontent-ref %}
## Step 4: Create a facility
A facility organizes the users and devices within a region. Open [**Facilities**](https://app.dispel.com/facilities), click **Create New Facility**, then choose a region and enter a facility name.
{% content-ref url="/pages/iIGPHdUcoQYXpDOtkU6y" %}
[Facilities](/build-your-environment/infrastructure/deployment-infrastructure/facilities.md)
{% endcontent-ref %}
## Step 5: Create a device
Add the device under its facility, and set the ports and protocols people will reach it on. Those ports and protocols are what you grant in a device ACL.
{% content-ref url="/pages/lt1FtZGZGh5fMO4OJruD" %}
[Add devices](/build-your-environment/infrastructure/device-management/create-a-device.md)
{% endcontent-ref %}
## Step 6: Enable a connection method
Choose how people reach the device. Build a Virtual Desktop stack for the region, or enable Browser Connect for the region and then turn it on per device.
{% content-ref url="/pages/ZSuvQXMXvjEejT9fzVe3" %}
[Stacks](/connect-to-your-systems/connection-methods/virtual-desktops/stacks.md)
{% endcontent-ref %}
{% content-ref url="/pages/h2dX46fMinJYukYx3dfd" %}
[Enable Browser Connect for a region](/connect-to-your-systems/connection-methods/browser-connect/enable-browser-connect-for-a-region.md)
{% endcontent-ref %}
## Step 7: Invite a user
Add the person who will connect by inviting them to the organization. Their role sets the organization permissions they start with.
{% content-ref url="/pages/uhrA8eFZhgOHIrZ4fYMq" %}
[Invite a User](/manage-users-and-access/users/invite-a-user.md)
{% endcontent-ref %}
## Step 8: Add the user to a facility
Add the user to the facility their device lives in. Adding them to the facility first lets you grant device ACLs and include them in an access window there.
{% content-ref url="/pages/P0f4nzcWV4u7gdw79WBK" %}
[Add a User to a Facility](/build-your-environment/infrastructure/deployment-infrastructure/facilities/add-a-user-to-a-facility.md)
{% endcontent-ref %}
## Step 9: Set device ACLs
Grant the user access to the device on a per-port, per-protocol basis, so they reach only what you intend.
{% content-ref url="/pages/ec3x27h3lkamFyKUKIiP" %}
[Device access (ACLs)](/build-your-environment/infrastructure/device-management/device-access-acls.md)
{% endcontent-ref %}
## Step 10: Create an access window
If your organization requires an access window to connect, create one for the facility. As an administrator you create the window directly, and the members you add get access for the period you schedule.
{% content-ref url="/pages/mOV62fiPGAficJuFZowP" %}
[Create an approved access window](/connect-to-your-systems/access-windows/create-an-approved-access-window.md)
{% endcontent-ref %}
## Step 11: Verify a first connection
Confirm the path end to end by connecting yourself. Reserve a Virtual Desktop, or launch a Browser Connect session, and reach the device.
{% content-ref url="/pages/F5VR2ahbR8RlmFvqxNfv" %}
[Reserve a Virtual Desktop (Admin)](/connect-to-your-systems/connection-methods/virtual-desktops/reserve-a-virutal-desktop-admin.md)
{% endcontent-ref %}
{% content-ref url="/pages/UzR1OhUnxYiRGGaCbnnu" %}
[Connect to a Browser Connect Session (Admin)](/connect-to-your-systems/connection-methods/browser-connect/connect-to-a-browser-connect-session-admin.md)
{% endcontent-ref %}
## Where to go next
To manage many people at once, assign devices and access windows through [organization and facility groups](/manage-users-and-access/groups.md). To govern how people sign in, set up the [Policy Builder](/secure-and-govern/policy-builder.md).
---
# Agent Instructions
This documentation is published with GitBook. GitBook is the documentation platform designed so that both humans and AI agents can read, navigate, and reason over technical content effectively. Learn more at gitbook.com.
## Querying This Documentation
If you need additional information that is not directly available in this page, you can query the documentation by asking a question.
Perform an HTTP GET request on the following URL with the `ask` and `goal` query parameters:
```
GET https://docs.dispel.com/get-started/getting-started-with-dispel/org-admin-quick-start-guide.md?ask=&goal=
```
`ask` is the immediate question: it should be specific, self-contained, and written in natural language.
`goal` is what the user is ultimately trying to achieve, the reason they need the answer. Sharing it helps GitBook give you a better, more relevant answer. A goal is most helpful when it describes the outcome the user wants rather than restating the question. For example, with `ask=how do I create an API token`, a goal like `automate deployments from our CI pipeline` lets GitBook tailor the answer to that use case.
The response will contain a direct answer to the question and relevant excerpts and sources from the documentation.
Use this mechanism when the answer is not explicitly present in the current page, you need clarification or additional context, or you want to retrieve related documentation sections.